Get Started
Introduction
Shuttle UI is easy to use modern CSS component library to help you build elegant looking webpages with shuttle speed.
Installation
To get started with Shuttle UI you need to include it's CSS inside head of your HTML file.
<link rel="stylesheet" href="https://shuttleui.netlify.app/components/components-styles/shuttleUI-main.css">
Starter Template
Make sure you have linked the files properly in your webpage. Some components like modal, snackbar and rating will also require Javascript so for them to function fully you have to also add the Shuttle UI javascript file. Follow the example below on how to import Shuttle UI into your webpage.
                    <!DOCTYPE html>
                    <html>
                        <head>
                        <!--Import shuttleUI-main.css-->
                        <link rel="stylesheet" href="https://shuttleui.netlify.app/components/components-styles/shuttleUI-main.css">

                        <!--Let browser know website is optimized for mobile-->
                        <meta name="viewport" content="width=device-width, initial-scale=1.0"/>
                        </head>

                        <body>
                            <!--Shuttle ui uses font-awesome 5 for icons so make sure to install it as well
                            if you are using components that involves icons-->
                            <script src="https://shuttleui.netlify.app/components/componentsJS/shuttleui-script.js"></script>
                            <script src="https://kit.fontawesome.com/2352d5969b.js" crossorigin="anonymous"></script>
                        </body>
                    </html>
Alerts
Alert messages are great way to notify and catch user's attention about something special or importatnt.
Simple Alert
There are six different types of alerts. Use class-name alert and add another class-name for type of alert like alert-success to give it more meaning.
Example of a primary alert
Example of a secondary alert
Example of a success alert
Example of a danger alert
Example of a warning alert
Example of an info alert
                        <div class="alert alert-primary">
                            <p>Example of a primary alert</p>
                        </div>

                        <div class="alert alert-secondary">
                            <p>Example of a secondary alert</p>
                        </div>

                        <div class=" alert alert-success">
                            <p>Example of a success alert</p>
                        </div>

                        <div class="alert alert-danger">
                            <p>Example of a danger alert</p>
                        </div>

                        <div class="alert alert-warning">
                            <p>Example of a warning alert</p>
                        </div>

                        <div class="alert alert-info">
                            <p>Example of an info alert</p>
                        </div>
Alerts with icon
Alert can have icon along with the text. Add align-center utility class to align text and icon inside alert.
An example alert with an icon
Example of a success alert with icon
Example of a danger alert with icon
Example of a warning alert with icon
                    <div class="align-center alert alert-primary">
                        <i class="md-ht-1 fas fa-bell"></i>
                        <p>An example alert with an icon</p>
                    </div>

                    <div class="align-center alert alert-success">
                        <i class="md-ht-1 fas fa-check-circle"></i>
                        <p>Example of a success alert with icon</p>
                    </div>

                    <div class="align-center alert alert-danger">
                        <i class="md-ht-1 fas fa-exclamation-triangle"></i>
                        <p>Example of a danger alert with icon</p>
                    </div>

                    <div class="align-center alert alert-warning">
                        <i class="md-ht-1 fas fa-exclamation-triangle"></i>
                        <p>Example of a warning alert with icon</p>
                    </div>
Avatar
Avatars are images used as a profile picture. Avatars comes in different variants round, square and avatars with initial/text-avatars. Each variant comes in four different sizes.
Round avatars
To use round avatars add class-name avatar and avatar-round. And to adjust size you need to include avatar-lg, avatar-md, avatar-sm or avatar-xs class-name.
                    <div>
                        <img src="./components/assets/avatar-girl.jpg" class="avatar avatar-round avatar-lg"
                            alt="round large avatar image">
                    </div>

                    <div>
                        <img src="./components/assets/avatar-man.jpg" class="avatar avatar-round avatar-md"
                            alt="round medium avatar image">
                    </div>

                    <div>
                        <img src="./components/assets/avatar-badminton.jpg" class="avatar avatar-round avatar-sm"
                            alt="round small avatar image">
                    </div>

                    <div>
                        <img src="./components/assets/avatar-badminton.jpg" class="avatar avatar-round avatar-xs"
                            alt="round extra small avatar image">
                    </div>
Square avatars
To use square avatars add class-name avatar-square along with class-name avatar. And to adjust size you need to include avatar-lg, avatar-md, avatar-sm or avatar-xs class-name.
                    <div>
                        <img src="./components/assets/avatar-girl.jpg" class="avatar avatar-square avatar-lg"
                            alt="square large avatar image">
                    </div>

                    <div>
                        <img src="./components/assets/avatar-man.jpg" class="avatar avatar-square avatar-md"
                            alt="square medium avatar image">
                    </div>

                    <div>
                        <img src="./components/assets/avatar-badminton.jpg" class="avatar avatar-square avatar-sm"
                            alt="square small avatar image">
                    </div>

                    <div>
                        <img src="./components/assets/avatar-badminton.jpg" class="avatar avatar-square avatar-xs"
                            alt="square extra small avatar image">
                    </div>
Avatars with initials/Text
Avatars that display text or initials. To use text avatar include avatar-text class-name along with avatar And to adjust size you need to include avatar-lg, avatar-md, avatar-sm or avatar-xs class-name.
                    <div class="avatar avatar-text avatar-round avatar-lg">
                        AB
                    </div>

                    <div class="avatar avatar-text avatar-round avatar-md">
                        BW
                    </div>

                    <div class="avatar avatar-text avatar-round avatar-sm">
                        WE
                    </div>

                    <div class="avatar avatar-text avatar-round avatar-xs">
                        SR
                    </div>
Badges
Badges are generally used on top right corner to show notification or bottom right corner to show online/offline status.
Badges on text
Text badge will resize themselves as per the size of the text. To use badge on text add class-name badge.
Badge on heading 1 New
Badge on heading 2 New
Badge on heading 3 New
Badge on heading 4 New
Badge on heading 5 New
Badge on normal text New
                    <h1>Badge on heading 1 <span class="badge">New</span></h1>
                    <h2>Badge on heading 2 <span class="badge">New</span></h2>
                    <h3>Badge on heading 3 <span class="badge">New</span></h3>
                    <h4>Badge on heading 4 <span class="badge">New</span></h4>
                    <h5>Badge on heading 5 <span class="badge">New</span></h5>
                    <p class="md-1">Badge on normal text <span class="badge">New</span></p>
Badges on icons
Badge can be used with icons such as notification bell or shopping cart. To add icon on badge use badge-container class-name on parent container/element. And use badge along with badge-icon class-name on badge element.
                    <div><i class="badge-container fas fa-bell fa-3x"><span class="badge badge-icon">5</span></i></div>
                    <div><i class="badge-container fas fa-shopping-cart fa-3x"><span class="badge badge-icon">5</span></i></div>
                    <div><i class="badge-container fas fa-envelope fa-3x"><span class="badge badge-icon">5</span></i></div>
Badges on Avatars
Badges on avatars are used to show online/offline status. Use class-name badge-container on parent container/element. And use badge-online, badge-offline, badge-dnd or badge-last-seen along with class-name badge on the element as per need.
                    <div class="badge-container">
                        <img src="./components/assets/avatar-girl.jpg" class=" avatar avatar-round avatar-lg"
                            alt="round large avatar image"> <span class="badge badge-online"></span>
                    </div>

                    <div class="badge-container">
                        <img src="./components/assets/avatar-man.jpg" class="avatar avatar-round avatar-md"
                            alt="round medium avatar image"> <span class="badge badge-online badge-dnd"></span>
                    </div>

                    <div class="badge-container">
                        <img src="./components/assets/avatar-badminton.jpg" class="avatar avatar-round avatar-sm"
                            alt="round small avatar image"> <span class="badge badge-offline"></span>
                    </div>

                    <div class="badge-container">
                        <img src="./components/assets/avatar-badminton.jpg" class="avatar avatar-round avatar-xs"
                            alt="round extra small avatar image"> <span class="badge badge-last-seen">2m</span>
                    </div>
Buttons
Buttons are most common components in websites. Button component is used to trigger an action, such as submitting a form, opening a dialog, adding item to cart, or performing a delete operation.
Solid Buttons
These buttons are used for primary actions in websites. To add a primary button use class-name btn along with variant class-name such as btn-primary, btn-secondary, btn-success, btn-danger, btn-warning or btn-info.
                    <button class="btn btn-primary">Primary Button</button>
                    <button class="btn btn-secondary">Secondary Button</button>
                    <button class="btn btn-success">Success Button</button>
                    <button class="btn btn-danger">Danger Button</button>
                    <button class="btn btn-warning">Warning Button</button>
                    <button class="btn btn-info">Info Button</button>
Outline Buttons
These are buttons with minimal styling. To add outline buttons use class-name btn along with variant class-name such as btn-outline-primary, btn-outline-secondary, btn-outline-success, btn-outline-danger, btn-outline-warning or btn-outline-info.
                    <button class="btn btn-outline-primary">Primary Button</button>
                    <button class="btn btn-outline-secondary">Secondary Button</button>
                    <button class="btn btn-outline-success">Success Button</button>
                    <button class="btn btn-outline-danger">Danger Button</button>
                    <button class="btn btn-outline-warning">Warning Button</button>
                    <button class="btn btn-outline-info">Info Button</button>
Link Buttons
You can also make anchor element as a button. To make anchor button add btn class-name along with a variant of button and give it a role="button" for accessibility purpose.
                    <a class="btn btn-primary" href="#" role="button">Link Primary</a>
                    <a class="btn btn-secondary" href="#" role="button">Link Secondary</a>
Icon Buttons
You can make icon button or icon button with text by adding icons from fontawesome within your button element.
                    <button class="btn btn-primary"><i class="fas fa-cart-plus"></i></button>
                    <button class="btn btn-primary"><i class="fas fa-bars"></i></button>
                    <button class="btn btn-primary"><i class="fas fa-trash-alt"></i></button>
                    <button class="btn btn-primary"><i class="fas fa-times"></i></button>

                    <button class="btn btn-primary"><i class="fas fa-cart-plus"></i>
                    <span class="md-ht-1">ADD TO CART</span></button>
                    <button class="btn btn-primary"><i class="fas fa-bars"></i><span class="md-ht-1">MENU</span></button>
                    <button class="btn btn-primary"><i class="fas fa-trash-alt"></i><span class="md-ht-1">DELETE</span></button>
                    <button class="btn btn-primary"><i class="fas fa-times"></i><span class="md-ht-1">CLOSE</span></button>
Floating action Button
Floating action button can be used by adding btn class-name along with btn-fab. This button will be fixed to right-bottom corner.
<button class="btn btn-fab align-items-center"> + </div>
Cards
A card is a container in itself having a header, body and footer.
Cards with Badges
All cards follow same template in shuttle UI. To make a card use class-name card in your main container. Cards with badge use badge component to add a badge on top of the image. Copy the below code snippet, put text and image of your own and you are good to go.
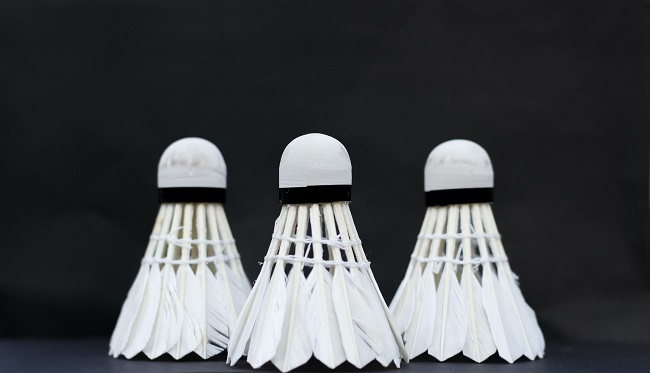 Trending
Yonex Feather Shuttle
Lorem ipsum dolor sit amet consectetur
Rs.490 Rs.1299 (62% OFF)
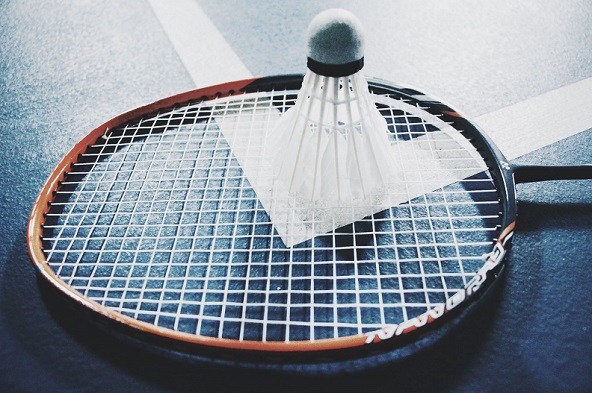 Sale
Sale
Yonex Racquet
Lorem ipsum dolor sit amet consectetur
Rs.1,349 Rs.1925 (30% OFF)
                <div class="card align-items-center">
                    <div class="card-header">
                        <img class="card-img" src="./components/assets/shuttles.jpg" alt="">
                        <span class="card-badge badge">Trending</span>
                    </div>
                    <div class="card-body">
                        <h3>Yonex Feather Shuttle</h3>
                        <p class="card-description">Lorem ipsum dolor sit amet consectetur</p>
                        <p class="md-ht-1">Rs.490 <span class="card-discount">
                        <span class="original-price md-ht-1"> Rs.1299 </span> (62% OFF)</span> </p>
                    </div>
                    <div class="card-footer">
                        <button class="card-btn btn btn-primary"><i class="fas fa-cart-plus"></i>
                        <span class="md-ht-1">ADD TO CART</span></button>
                    </div>
                </div>

                <div class="card align-items-center">
                    <div class="card-header">
                        <img class="card-img" src="./components/assets/racquet-shuttle.jpg" alt="">
                        <span class="card-badge badge">Sale</span>
                    </div>
                    <div class="card-body">
                        <h3>Yonex Racquet</h3>
                        <p class="card-description">Lorem ipsum dolor sit amet consectetur</p>
                        <p class="md-ht-1">Rs.1,349 <span class="card-discount">
                        <span class="original-price md-ht-1"> Rs.1925 </span> (30% OFF)</span> </p>
                    </div>
                    <div class="card-footer">
                        <button class="card-btn btn btn-primary"><i class="fas fa-cart-plus"></i>
                        <span class="md-ht-1">ADD TO CART</span></button>
                    </div>
                </div>
Horizontal Cards
Horizontal cards are there to add diversity in card components. They come up with two button elements. Use class-name card-horizontal along with card in main container. And add card-horizontal-img class-name in image element. Copy the below code-snippet to use card component in your project.
Sale
Yonex Feather Shuttle
Rs.1,349 Rs.1925 (30% OFF)
                    <div class="card align-items-center card-horizontal">
                        <div class="card-header">
                            <img class="card-img card-horizontal-img" src="./components/assets/shuttles.jpg" alt="">
                            <span class="card-badge badge">Sale</span>
                        </div>
                        <div class="md-ht-1 card-body">
                            <h3>Yonex Feather Shuttle</h3>
                            <p class="md-ht-1">Rs.1,349 <span class="card-discount"> <span class="original-price md-ht-1"> Rs.1925 </span>
                            (30% OFF)</span> </p>
                            <div class="card-horizontal-footer">
                                <button class="card-horizontal-btn btn btn-primary"><i class="fas fa-cart-plus"></i>
                                <span class="md-ht-1">ADD TO CART</span></button>
                                <button class="card-horizontal-btn btn btn-outline-primary"><i class="fas fa-heart"></i>
                                <span class="md-ht-1">SAVE TO WISHLIST</span></button>
                            </div>
                        </div>

                    </div>
Cards with Dismiss
Card with dismiss comes with a cross button on right side of the card. To add dismiss you would have to add font-awesome icon and give it a class-name of card-dismiss. Copy the below-code snippet to use cards with dismiss.

Yonex Feather Shuttle
Lorem ipsum dolor sit amet consectetur
Rs.490 Rs.1299 (62% OFF)
                    <div class="card align-items-center">
                        <div class="card-header">
                            <img class="card-img" src="./components/assets/badminton shuttle.jpg" alt="">
                            <span><i class="card-dismiss fas fa-times"></i></span>
                        </div>
                        <div class="card-body">
                            <h3>Yonex Feather Shuttle</h3>
                            <p class="card-description">Lorem ipsum dolor sit amet consectetur</p>
                            <p class="md-ht-1">Rs.490 <span class="card-discount">
                            <span class="original-price md-ht-1"> Rs.1299 </span> (62% OFF)</span> </p>
                        </div>
                        <div class="card-footer">
                            <button class="card-btn btn btn-primary"><i class="fas fa-cart-plus"></i>
                            <span class="md-ht-1">ADD TO CART</span></button>
                        </div>
                    </div>
Cards with Overlay
To use card with overlay copy the below code-snippet and use class-name as given.
Yonex Feather Shuttle
Currently out of stock
Rs.490 Rs.1299 (62% OFF)

                        <div class="card align-items-center">
                            <div class="card-overlay align-items-center">SOLD OUT</div>
                            <div class="card-header">
                                <img class="card-img" src="./components/assets/badminton shuttle.jpg" alt="">
                            </div>
                            <div class="card-body">
                                <h3>Yonex Feather Shuttle</h3>
                                <p class="card-description">Currently out of stock</p>
                                <p class="md-ht-1">Rs.490 <span class="card-discount">
                                <span class="original-price md-ht-1"> Rs.1299 </span>
                                (62% OFF)</span> </p>
                            </div>
                            <div class="card-footer">
                                <button class="card-btn btn btn-primary"><i class="fas fa-cart-plus"></i>
                                <span class="md-ht-1">ADD TO CART</span></button>
                            </div>
                        </div>

                        <!--Second card with overlay-->
                        <div class="card align-items-center">
                            <div class="card-header">
                                <img class="card-img" src="./components/assets/smash badminton.jpg" alt="">
                            </div>
                            <div class="card-body card-overlay-text btn btn-primary">
                                New Arrival
                            </div>
                            <div class="card-footer">
                                <button class="btn btn-primary">Shop Now</button>
                            </div>
                        </div>
Text only Cards
Text only cards are the simplest cards available. You can align-text in the body using utility classes like align-text-left, align-text-center and align-text-right. You can also add buttons in text only cards by adding button components at the footer of the card.
Card Title
Lorem ipsum dolor sit amet consectetur adipisicing elit. Enim totam sint, cum illo quasi autem quas eum exercitationem fugiat eligendi!
                    <div class="card align-items-center">
                        <div class="card-header text-left">
                        <h3>Card Title</h3>
                        </div>
                        <div class="card-body text-center">
                            <p>Lorem ipsum dolor sit amet consectetur adipisicing elit.
                            Enim totam sint, cum illo quasi autem quas eum exercitationem fugiat eligendi!</p>
                        </div>
                        <div class="card-footer align-items-center">
                            <button class="btn btn-primary" role="button">Yes</button>
                            <button class="btn btn-outline-primary">No</button>
                        </div>
                    </div>
Card With shadow
Although all cards in Shuttle UI comes with shadow but you can use alternate shadow using class-name card-shadow-alternate in the main container.
Yonex Feather Shuttle
Lorem ipsum dolor sit amet consectetur
Rs.490 Rs.1299 (62% OFF)
                        <div class="card align-items-center card-shadow-alternate">
                            <div class="card-header">
                                <img class="card-img" src="./components/assets/badminton shuttle.jpg" alt="">
                            </div>
                            <div class="card-body">
                                <h3>Yonex Feather Shuttle</h3>
                                <p class="card-description">Lorem ipsum dolor sit amet consectetur</p>
                                <p class="md-ht-1">Rs.490 <span class="card-discount">
                                <span class="original-price md-ht-1"> Rs.1299 </span> (62% OFF)</span> </p>
                            </div>
                            <div class="card-footer">
                                <button class="card-btn btn btn-primary"><i class="fas fa-cart-plus">
                                </i><span class="md-ht-1">ADD TO CART</span></button>
                            </div>
                        </div>
Images
Images are made responsive so that it takes width of the enclosed container.
Responsive images
To make images responsive add class responsive-img in the img tag. If you are using picture tag make sure you add the responsive-img class in img element and not on picture element. Resize the screen to see the responsiveness of image.

                    <picture>
                        <source srcset="./components/assets/mobile.jpg" media="(max-width: 400px)">
                        <source srcset="./components/assets/web.jpg" >
                        <img class="responsive-img" src="./components/assets/web.jpg" alt="responsive img example">
                    </picture>
Round images
You can make images round by adding round-img class to img tag. Round images comes in three different sizes. Add round-lg, round-md round-sm classes to set size on round images.
                    <img class="round-img round-lg" src="./components/assets/avatar-badminton.jpg" alt="">
                    <img class="round-img round-md" src="./components/assets/avatar-badminton.jpg" alt="">
                    <img class="round-img round-sm" src="./components/assets/avatar-badminton.jpg" alt="">
Inputs
Inputs are most important components of any webpage. Inputs are very helpful in getting information from user.
Textbox
Text input fields are typically used to take data such as firstname, lastname, fullname and feedback/comment. You can change size of the input box using form-input-lg and form-input-md along with form-input class.
                        <form>

                            <div class="form-set">
                                <label class="form-label" for="fname">First Name:</label>
                                <input class="form-input form-input-lg pd-1" type="text" id="fname" name="fname">
                            </div>

                            <div class="form-set">
                                <label class="form-label" for="lname">Last Name:</label>
                                <input class="form-input form-input-lg pd-1" type="text" id="lname" name="lname">
                            </div>

                            <div class="form-set">
                                <label class="form-label" for="fullname">Full Name:</label>
                                <input class="form-input form-input-lg pd-1" type="text" id="fullname" name="fullname">
                            </div>

                            <div class="form-set">
                                <label class="form-label" for="feedback-box">Send Feedbacks:</label>
                                <textarea class="form-input pd-1" name="feedback" id="feedback-box" cols="30" rows="10"></textarea>
                            </div>

                        </form>
Checkbox, radio and select inputs
Add class form-check in parent container to align checkboxes and radio with their respective labels.
                        <form>
                            <div class="form-check">
                                <input type="checkbox" value="demo" id="examplecheck">
                                <label class="form-label-inline" for="examplecheck"> Example checkbox</label>
                            </div>

                            <div class="form-check md-vt-1">
                                <input class="form-check-input" type="radio" name="exampleradio" id="exampleradio" value="option1" checked>
                                <label class="form-label-inline" for="exampleradio">Example radio</label>
                            </div>

                            <div class="form-check">
                                <input class="form-check-input" type="radio" name="exampleradio" id="exampleradio2" value="option2" checked>
                                <label class="form-label-inline" for="exampleradio2">Example radio 2</label>
                            </div>

                            <div class="form-set">
                                <label class="form-label" for="exampleselect">Example select</label>
                                <select class="form-input form-input-lg pd-1" id="exampleselect">
                                <option>1</option>
                                <option>2</option>
                                <option>3</option>
                                <option>4</option>
                                <option>5</option>
                                </select>
                            </div>

                        </form>
Inputs with default validation
You can add default validation in form by adding required attribute in input fields. If you are adding default validation make sure you use appropriate type. For e.g for email use type="email".
                        <form>
                            <div class="form-set">
                                <label class="form-label" for="fname">First Name:</label>
                                <input class="form-input form-input-lg pd-1" type="text" id="fname" name="fname" required>
                            </div>

                            <div class="form-set">
                                <label class="form-label" for="lname">Last Name:</label>
                                <input class="form-input form-input-lg pd-1" type="text" id="lname" name="lname" required>
                            </div>

                            <div class="form-set">
                                <label class="form-input form-label" for="email">Email:</label>
                                <input class="form-input form-input-lg pd-1" type="email" id="email" name="email" required>
                            </div>

                            <div class="form-set">
                                <label class="form-label" for="password">Password:</label>
                                <input class="form-input form-input-lg pd-1" type="password" id="password" name="password" required>
                            </div>

                            <input type="submit" class="btn btn-primary form-btn" value="Sign In" role="button">
                        </form>
Input with custom validation and error style
Shuttle UI comes with custom validation and error styling on form fields. To add
custom validation add no-validate boolean attribute in form tag and
use
class form-validation. Make sure to add Shuttle UI JS script if you
are
using custom validation. Copy the below code snipppet to add custom validation in form fields.
                    <form class="form-validation" action="#" novalidate>
                        <div class="form-set">
                            <label class="form-label" for="fname">Username:</label>
                            <input class="form-input form-input-lg pd-1" type="text" id="username" name="username">
                            <div class="form-error-msg"></div>
                        </div>

                        <div class="form-set">
                            <label class="form-label" for="user-email">Email:</label>
                            <input class="form-input form-input-lg pd-1" type="email" id="user-email" name="email">
                            <div class="form-error-msg"></div>
                        </div>

                        <div class="form-set">
                            <label class="form-label" for="user-password">Password:</label>
                            <input class="form-input form-input-lg pd-1" type="password" id="user-password" name="password">
                            <div class="form-error-msg"></div>
                        </div>

                        <div class="form-set">
                            <label class="form-label" for="user-password-2">Confirm Password:</label>
                            <input class="form-input form-input-lg pd-1" type="password" id="user-password-2" name="password-2">
                            <div class="form-error-msg"></div>
                        </div>

                        <button type="submit" class="btn btn-primary form-btn">Sign Up</button>
                    </form>
Text Utilities
You can use various text utilites to change display of the text.
Headings
We provide some basic styling for header tags you need to use h1, h2, h3, h4, h5, h6 elements. You can also use .h1, .h2 , .h3, .h4, .h5, .h6 classes, when you want the font styling of a heading but cannot use the HTML elements.
h1. Shuttle UI heading
h2. Shuttle UI heading
h3. Shuttle UI heading
h4. Shuttle UI heading
h5. Shuttle UI heading
h6. Shuttle UI heading
                        <h1>h1. Shuttle UI heading</h1>
                        <h2>h2. Shuttle UI heading</h2>
                        <h3>h3. Shuttle UI heading</h3>
                        <h4>h4. Shuttle UI heading</h4>
                        <h5>h5. Shuttle UI heading</h5>
                        <h6>h6. Shuttle UI heading</h6>
Different sizes of text
You can also make your text of different sizes. Shuttle UI has mainly four sizestext-xs, text-sm, text-md, text-lg and text-xl.
Example of xtra-small size text
Example of small size text
Example of medium size text
Example of large size text
Example of Xtra-Large size text
                        <p class="text-xs">Example of xtra-small size text</p>
                        <p class="text-sm">Example of small size text</p>
                        <p class="text-md">Example of medium size text</p>
                        <p class="text-lg">Example of large size text</p>
                        <p class="text-xl">Example of Xtra-Large size text</p>
Different alignment for text
Use the following class to align text left, center or right, text-left, text-center, and text-right.
This paragraph text has left alignment
This paragraph text is center aligned
This paragraph text has right alignment
                        <p class="text-left">This paragraph text has left alignment</p>
                        <p class="text-center">This paragraph text is center aligned</p>
                        <p class="text-right">This paragraph text has right alignment</p>
Some other utility classes for text
You can also make your text highlight, gray, delete, underline and bold by using corresponding classes - text-highlight, text-gray, text-delete, text-decoration-underline, text-bold-500 and text-bold-700.
This is a highlighted text
This is a gray text
This is a deleted text
This is an underlined text
This is a bold text with weight 500
This is a bold text with weight 700
                        <p class="text-highlight">This is a highlighted text</p>
                        <p class="text-gray">This is a gray text</p>
                        <p class="text-deleted">This is a deleted text</p>
                        <p class="text-decoration-underline">This is an underlined text</p>
                        <p class="text-bold-500">This is a bold text with weight 500</p>
                        <p class="text-bold-700">This is a bold text with weight 700</p>
Lists
Lists are group of continuous text or images. It helps in grouping similar items.
Unordered List
Unordered list comes with different variant of items marker. Add class list-decoration-square to get square bullet style. Similarly, you can also make your unordered list marker circle or disc by adding list-decoration-circle and list-decoration-disc classes.
- Square marker unordered list
- Square marker unordered list
- Square marker unordered list
- circle marker unordered list
- circle marker unordered list
- circle marker unordered list
- disc marker unordered list
- disc marker unordered list
- disc marker unordered list
                        <ul class="list-decoration-square">
                        <li>Square marker unordered list</li>
                        <li>Square marker unordered list</li>
                        <li>Square marker unordered list</li>
                        </ul>

                        <ul class="list-decoration-circle">
                        <li>circle marker unordered list</li>
                        <li>circle marker unordered list</li>
                        <li>circle marker unordered list</li>
                        </ul>

                        <ul class="list-decoration-circle">
                        <li>disc marker unordered list</li>
                        <li>disc marker unordered list</li>
                        <li>disc marker unordered list</li>
                        </ul>
Ordered List
Ordered list also comes with different variant of items marker. Use one ot the
following class modifier list-decoration-ualpha,
list-decoration-lalpha, list-decoration-uroman, list-decoration-lroman to style ordered
list markers.
                        <ol class="list-decoration-ualpha">
                            <li>Upper-case alphabets marker ordered list</li>
                            <li>Upper-case alphabets marker ordered list</li>
                            <li>Upper-case alphabets marker ordered list</li>
                        </ol>

                        <ol class="list-decoration-lalpha">
                            <li>Lower-case alphabets marker ordered list</li>
                            <li>Lower-case alphabets marker ordered list</li>
                            <li>Lower-case alphabets marker ordered list</li>
                        </ol>

                        <ol class="list-decoration-uroman">
                            <li>Upper-case roman marker ordered list</li>
                            <li>Upper-case roman marker ordered list</li>
                            <li>Upper-case roman marker ordered list</li>
                        </ol>

                        <ol class="list-decoration-lroman">
                            <li>Lower-case roman marker ordered list</li>
                            <li>Lower-case roman marker ordered list</li>
                            <li>Lower-case roman marker ordered list</li>
                        </ol>

                        <ol>
                            <li>Numbered ordered list</li>
                            <li>Numbered ordered list</li>
                            <li>Numbered ordered list</li>
                        </ol>
Inline, Unstyled lists and reversed list
Make your lists unstyled by adding class list-unstyled and make list inline by adding class list-inline.
                            <ol>
                            <li class="list-inline">Example of inline list</li>
                            <li class="list-inline">Example of inline list</li>
                            <li class="list-inline">Example of inline list</li>
                            </ol>

                            <ol class="list-unstyled">
                            <li>Example of unstyled list</li>
                            <li>Example of unstyled list</li>
                            <li>Example of unstyled list</li>

                            <ol reversed>
                            <li>Reverse ordered list</li>
                            <li>Reverse ordered list</li>
                            <li>Reverse ordered list</li>
                            </ol>
Stacked List
A List can contain a card/image/text, making stacks of item, they are primarily used in notification and shopping cart checkout. Check the below HTML for stacking list.
50% OFF in all Yonex racquets. Don't Miss it! Your order #124567 Delivered to your home. Your order #124568 Delivered to your home.

                        <ol class="list-unstyled">
                            <li>
                                <div class="card-notification">
                                    <div class="card-notification-header flex-row">
                                        <img class="card-notification-img"
                                        src="./components/assets/discount.png" alt="discount">
                                        <p class="md-ht-1 card-notification-desc"> <span class="text-bold-500">50% OFF
                                        </span> in all Yonex racquets. Don't Miss it!</p>
                                    </div>

                                    <div class="card-footer text-right">
                                        <p class="text-xs text-highlight">9:10 am</p>
                                    </div>
                                </div>
                            </li>
                            <li>
                                <div class="card-notification">
                                    <div class="card-notification-header flex-row">
                                        <img class="card-notification-img"
                                        src="./components/assets/delivered.png" alt="discount">
                                        <p class="md-ht-1 card-notification-desc"> Your order
                                        <span class="text-bold-500">#124567</span> Delivered to your home.</p>
                                    </div>

                                    <div class="card-footer text-right">
                                        <p class="text-xs text-highlight">9:05 am</p>
                                    </div>
                                </div>
                            </li>
                            <li>
                                <div class="card-notification">
                                    <div class="card-notification-header flex-row">
                                        <img class="card-notification-img"
                                        src="./components/assets/delivered.png" alt="discount">
                                        <p class="md-ht-1 card-notification-desc">
                                        Your order <span class="text-bold-500">#124568</span> Delivered to your home.</p>
                                    </div>

                                    <div class="card-footer text-right">
                                        <p class="text-xs text-highlight">9:02 am</p>
                                    </div>
                                </div>
                            </li>
                        </ol>
Navbar
Navbar includes different sections for brand logo, search input and navbar menu.
Simple Navbar
Shuttle UI simple navbar is responsive by default without an hamburger. It has a section for brand logo. The navbar-form section includes a search bar which shrinks on smaller viewport size. The navbar-menu section includes icon with nav menu links for navigation. Check the below HTML for navbar.
                            <nav class="navbar flex-row">
                                <a class="navbar-brand" href="#">
                                    <img class="responsive-img navbar-logo"
                                    src="./components/assets/component-nav-logo.png" alt="">
                                </a>
                                <form class="navbar-form form-label-inline">
                                    <input class="form-search navbar-form"
                                    type="search" placeholder="Search" aria-label="Search">
                                </form>

                                <ul class="navbar-menu list-unstyled flex-row">
                                    <li class="list-inline">
                                        <a class="flex-column menu-link" href="#">
                                            login
                                            <i class="fas fa-sign-in-alt"></i>
                                        </a>
                                    </li>
                                    <li class="list-inline">
                                        <a class="flex-column menu-link" href="#">
                                            wishlist
                                            <i class="fas fa-heart"></i>
                                        </a>
                                    </li>

                                    <li class="list-inline">
                                        <a class="flex-column menu-link" href="#">
                                            cart
                                            <i class="fas fa-shopping-cart"></i>
                                        </a>
                                    </li>

                                </ul>
                            </nav>
Responsive Navbar
Although Shuttle UI navbar is responsive by default but to have a feature of hamburger on smaller viewport you need to add responsive navbar which is designed specifically for that purpose. The navbar-form section includes a search bar which shrinks on smaller viewport size. The navbar-menu section includes icon with menu links for navigation. This menu section gets hidden in smaller viewport and a hamburger in menu gets displayed in place of menu icons. See the HTML code below for responsive navbar.
                            <nav class="navbar flex-row">
                            <a class="navbar-brand" href="#">
                                <img class="responsive-img navbar-logo" src="./components/assets/component-nav-logo.png" alt="">
                            </a>
                            <form class="navbar-form form-label-inline">
                                <input class="form-search navbar-form" type="search" placeholder="Search" aria-label="Search">
                            </form>

                            <ul class="navbar-menu menu-hamburger list-unstyled flex-row">
                                <li class="list-inline">
                                    <a class="flex-column menu-link menu-hamburger" href="#">
                                        <i class=" fas fa-bars fa-2x"></i>
                                    </a>

                                </li>
                            </ul>
                            <ul class="navbar-menu navbar-responsive-menu list-unstyled flex-row">

                                <li class="list-inline">
                                    <a class="flex-column menu-link" href="#">
                                        login
                                        <i class="fas fa-sign-in-alt"></i>
                                    </a>
                                </li>
                                <li class="list-inline">
                                    <a class="flex-column menu-link" href="#">
                                        wishlist
                                        <i class="fas fa-heart"></i>
                                    </a>
                                </li>

                                <li class="list-inline">
                                    <a class="flex-column menu-link" href="#">
                                        cart
                                        <i class="fas fa-shopping-cart"></i>
                                    </a>
                                </li>

                            </ul>
                        </nav>
Modal
Modal's are displayed on top of the main content, to seek user's attention regarding particular information
Simple Modal
Modal's are used in places where we require immediate action from user or notify user about an important notification. Check the HTML code below for modal.
GET 10% OFF
Checkout now & receive 10% OFF your first order?
GET 10% OFF
Checkout now & receive 10% OFF your first order?
                        <div class="flex-column modal">
                            <span><i class="modal-dismiss btn-modal-cancel fas fa-times"></i></span>

                            <div class="modal-header">
                                <h2 class="modal-text text-bold-700">GET 10% OFF</h2>
                            </div>

                            <div class="modal-body">
                                <p class="text-gray text-bold-500 text-center">Checkout now & receive 10% OFF your first order?</p>
                            </div>

                            <div class="modal-footer flex-row">
                                <button class="btn btn-outline-secondary btn-modal btn-modal-cancel">Cancel</button>
                                <button class="btn btn-primary btn-modal">Get 10% OFF</button>
                            </div>
                        </div>
Javascript
                            btnModalDemo.addEventListener("click",()=>{
                                bodyOverlay.style.display = "block"
                                modal.style.display = "flex"
                            })

                            btnModalCancel.forEach(btn=>{
                                btn.addEventListener("click",()=>{
                                    bodyOverlay.style.display = "none"
                                    modal.style.display = "none"
                                })
                            })
Rating
Ratings are useful for taking user's insights about their experience.
Star Rating
The most common ways of getting rating from user is star ratings in webistes. Check out the HTML code for star rating.
                        <div class="rating flex-row">

                            <input class="rating-input" type="radio" id="5-stars" name="rating" value="5" />
                            <label for="5-stars" class="rating-label form-label-inline"><i class="fas fa-star"></i></label>

                            <input class="rating-input" type="radio" id="4-stars" name="rating" value="4" />
                            <label for="4-stars" class="rating-label form-label-inline"><i class="fas fa-star"></i></label>

                            <input class="rating-input"type="radio" id="3-stars" name="rating" value="3" />
                            <label for="3-stars" class="rating-label form-label-inline"><i class="fas fa-star"></i></label>

                            <input class="rating-input" type="radio" id="2-stars" name="rating" value="2" />
                            <label for="2-stars" class="rating-label form-label-inline"><i class="fas fa-star"></i></label>

                            <input class="rating-input" type="radio" id="1-star" name="rating" value="1" />
                            <label for="1-star" class="rating-label form-label-inline"><i class="fas fa-star"></i></label>

                        </div>

                        <div class="rating-display"></div>
Javascript
                            const starsGiven = document.querySelectorAll('.rating-input')
                            const ratingDisplay = document.querySelector('.rating-display')

                            starsGiven.forEach(starInput=>{
                                starInput.addEventListener('click',()=>{
                                    ratingDisplay.innerHTML = `<p class="md-1 text-bold-500">You gave ${starInput.value} <star/p>`
                                })
                            })
Snackbar
Snackbars are used to provide short messages to user. They mostly appear on the bottom of the webpage. And do not iterfere in user's experience.
Different variant of Snackbar
Shuttle UI comes with four different variant of Snackbars. Add snackbar-primary, snackbar-danger, snackbar-success and snackbar-info classes for different variant of snackbars.
                            <div class="snackbar flex-row snackbar-primary pd-1">
                                <p class="md-ht-2">This is a primary snackbar</p>
                                <span class="btn-snackbar-cancel md-ht-2">
                                <i class="snackbar-dismiss fas fa-times"></i></span>
                            </div>

                            <div class="snackbar flex-row snackbar-danger pd-1">
                                <p class="md-ht-2">This is a danger snackbar</p>
                                <span class="btn-snackbar-cancel md-ht-2">
                                <i class="snackbar-dismiss fas fa-times"></i></span>
                            </div>

                            <div class="snackbar flex-row snackbar-success pd-1">
                                <p class="md-ht-2">This is a success snackbar</p>
                                <span class="btn-snackbar-cancel md-ht-2">
                                <i class="snackbar-dismiss fas fa-times"></i></span>
                            </div>

                            <div class="snackbar flex-row snackbar-info pd-1">
                                <p class="md-ht-2">This is a info snackbar</p>
                                <span class="btn-snackbar-cancel md-ht-2">
                                <i class="snackbar-dismiss fas fa-times"></i></span>
                            </div>
Javascript
                            const btnSnackbarDemo = document.querySelector('.btn-snackbar-demo')
                            const snackbar = document.querySelector('.snackbar-demo')
                            const btnSnackbarCancel = document.querySelectorAll('.snackbar-dismiss')

                            btnSnackbarDemo.addEventListener('click',()=>{
                                snackbar.style.display = "flex"
                            })

                            btnSnackbarCancel.forEach(btn=>{
                                btn.addEventListener('click',()=>snackbar.style.display="none")
                            })
Simplified Grid
Grids makes layout simpler and look more elegant. Shuttle UI right now has only two items and three items grid which takes equal amount of space of the container.
Two items in a grid
To use Shuttle UI two items grid add grid along with grid-2-col-1-row or grid-1-col-1-row classes. Checkout the HTML code below.
                <div class="grid grid-2-col-1-row">
                    <div class="card">
                        <img class="responsive-img" src="./components/assets/smash badminton.jpg" alt="badminton smash">
                    </div>
                     <div class="card">
                    <img class = "responsive-img"
                    src="./components/assets/shuttle-img.jpg" alt="drop in badminton">
                </div>
                    <div class="grid grid-1-col-row">
                        <div class="card">
                            <img class="responsive-img" src="./components/assets/smash badminton.jpg" alt="badminton smash">
                        </div>
                        <div class="card">
                            <img class = "responsive-img"
                            src="./components/assets/shuttle-img.jpg" alt="drop in badminton">
                        </div>
                    </div>
Three Items in a grid
To use Shuttle UI grid for three items add classes grid-3-col-1-row or grid-1-col-3-row. Check the HTML code below of three items in grid.
                <div class="grid grid-3-col-1-row">
                    <div class="card">
                        <img class = "responsive-img"
                        src="./components/assets/racquets and shuttles.jpg" alt="racquets and shuttles">
                    </div>
                    <div class="card">
                        <img class = "responsive-img"
                        src="./components/assets/racquets and shuttles.jpg" alt="racquets and shuttles">
                    </div>
                    <div class="card">
                        <img class = "responsive-img"
                        src="./components/assets/racquets and shuttles.jpg" alt="racquets and shuttles">
                    </div>
                </div>
                <div class="grid grid-1-col-3-row">
                    <div class="card">
                        <img class = "responsive-img"
                        src="./components/assets/racquets and shuttles.jpg" alt="racquets and shuttles">
                    </div>
                    <div class="card">
                        <img class = "responsive-img"
                        src="./components/assets/racquets and shuttles.jpg" alt="racquets and shuttles">
                    </div>
                    <div class="card">
                        <img class = "responsive-img"
                        src="./components/assets/racquets and shuttles.jpg" alt="racquets and shuttles">
                    </div>
                </div>
Slider
Sliders allows user to decide values in range. These are used to give rating and select price range or volume.
Normal Slider
This is a normal slider which works between a range of 0 to 100. The slider changes with a step of 1, You need to add slider and slider-range classes to use it.
                    <label class="form-label" for="slider">
                    <input id="slider" type="range" min="1" max="100" value="50" />

                    <div class="slider-range">
                        <span class="text-sm">1</span>
                        <span class="text-sm">50</span>
                        <span class="text-sm">100</span>
                    </div>
Customized Slider for rating
This is a customized slider of Shuttle UI to give rating from 0 to 5. The slider changes with a step of .1, You need to add slider-rating and slider-rating-range classes to use customiszed disabled slider of shuttle UI.
                    <label class="form-label" for="slider"></label>
                    <input class="slider-rating" type="range" min="1" max="5" value="3" step=".1" id="slider">
                    <div class="slider-rating-range">
                        <span class="text-sm"><i class="far fa-star"></i> 1</span>
                        <span class="text-sm"><i class="far fa-star"></i> 5</span>
                    </div>
Customiszed disabled Slider
Check the below HTML for diabled slider. You need to add slider-disable-group and slider-disabled to use customiszed disabled slider of shuttle UI.
                    <div class="slider-disable-group">
                    <label class="form-label-inline text-gray" for="slider"><i class="fas fa-volume-mute fa-2x"></i></label>
                    <input class="slider-disabled" type="range" min="1" max="5" value="3" step="1" disabled id="slider">
                    </div>